Back to all
Energy transition for smart homes - How to setup EVCC with your Synology NAS
How did I stumble over EVCC?
My parents renewed the infrastructure of their house by installing solar panels, a battery and wallbox. They also renewed the roof and windows making it more energy efficient. As the works finished my father came up to me asking me if I would be able to run EVCC in their household such that they could handle all the different components (battery, EV charging etc.) better. As I have a NAS (network attached storage) in their house this was quasi predestined for installing EVCC and trying things out.
Now, after I finished the setup and EVCC is running, I wanted to do sort of a short review and mention why I am so pleased with this programm and a quick walkthrough how you can set it up as well. But before I dive in, let me first explain to you what EVCC even is and how it works.
How does the software work?
EVCC (Electric Vehicle Charge Controller) is an open-source software platform that optimizes and controlls electric vehicle (EV) charging using solar energy. It integrates seamlessly with home energy systems—such as solar panels (PV systems) and home batteries. By gathering data on solar generation, electricity prices and EV charging status, EVCC ensures that your car charges using excess solar power whenever possible, reducing grid electricity reliance and lowering costs.
The system supports a wide range of EV chargers and smart meters, and integrates with smart home systems like Home Assistant, openHAB, and ioBroker. EVCC's flexibility allows it to connect with various devices using protocols like Modbus, SunSpec, and MQTT, making it highly adaptable to different energy setups. The integration of commercial wallboxes in the software comes only with a Sponsortoken on GitHub for a fee of 2$ per month.
In this article, I will show how EVCC manages PV systems, the electrical grid, and EV charging within a smart home. Additionally, I will present a short case study demonstrating how I used EVCC to control these components, and guide you step-by-step on setting it up with a Synology 918+ NAS using Docker.
What I like about EVCC
There are a lot of reasons why I loved the project and wanted to use it to install it in my parent's household. It is open source and supported by a strong community. You can check it out on GitHub. Its written with a modern software stack (Go and Vue) and features tons of possible customizations. What I specifically appreciate is its easy installation with Docker making it an excellent joice for IT-savvy people. I cannot tell how easy it is to be integrated into smart home systems as my parents do not use these but I imagine this is relatively easy as well just looking at how the software is built.
As I began to do my research prior installing the platform on my Synology I was really impressed how good the software is documented. This starts of with a demo version online, wich shows the user interface of the installed software. Furthermore there is a good overview how the architecture is built and how EVCC communicates with different devices and which devices are compatible. The documentation itself is clearly structured and finds the perfect balance of giving just enough information but not to overwhelm the reader with too much information. I know that good documentations should be standards but keep in mind that we are talking about an open source sofware which is powered by the community. I really had an easy time setting it up thanks to the good support.
I also really appreciate the API support and the sheer breadth of protocols which can be used to setup custom connections with the software. I did not use it up to this point but I can imagine how this allows to really make use of the software even in more complex environments.
Last but not least I want to highlight the user interface and the analytics of the platform. The user interface is a delight as it really allows to get users to get started quickly. Once up and running it really helps getting on top of things and having insights into the grid use and self consumption. The design features the main key performance indicators prominently but also invites for a deep dive into the energy household of the infrastructure.
All in all EVCC is incredibly versatile, offering numerous advantages which are:
- Open-source: Full customization is possible.
- Docker support: Simplifies setup with Docker containers.
- Extensive device compatibility: Connects to multiple devices, enabling holistic energy management.
- API support: Facilitates advanced customization and integration.
- Detailed documentation: Provides clear setup guides, making it accessible even for less tech-savvy users.
- User interface: Offers comprehensive data analysis and easy navigation.
Guide: How I set up EVCC on my NAS
In this case study, I’ll share how I integrated EVCC with a solar PV system, an EV charging station (wallbox), and a Synology 918+ NAS. The goal was to maximize solar energy usage, minimize grid dependence and efficiently manage EV charging.
The process I followed to set everything up can be boiled down into three steps. The first step involved checking the intranet and the interfaces of the systems I wanted to communicate with EVCC. The second step was all about setting up the configuration of EVCC itself. Finally I undertook the third and last step which was about setting up and running the Docker container on my Synology. In the following section I will go over the steps in more detail. Maybe it can serve as point of reference if you are struggling to setup EVCC. This means that you can follow the steps and set up your own version of EVCC at your home.
Check the systems you want to connect
At the beginning, start by making a plan which parts of the infrastructure you want to integrate into the platform. Therefore it is advisable to look at the classification of EVCC as these classification already show you which functionalities of the software you can use. The classification is as follows:
- Wallboxes and sockets
- Energy measurement
- Inverters and storage
- Vehicles
The infrastructure I wanted to integrate was:
- Kostal Plenticore
- Hardybarth Salia
- Renault Zoe
To integrate the Kostal Plenticore inverter together with the Kostal Smart Energy Meter (KSEM) into EVCC, I used it as an energy meter. The KSEM serves as a measuring device to record the current energy flow in the household (generation, consumption and grid consumption) and thus efficiently controls the surplus charging for the electric car which was a Renault Zoe in my parent's home. The wallbox I used to charge the Renault Zoe was a Hardybarth Salia. I will build the next steps upon this.
You should verify that everything is up and running as I did as well. Go to you devices, make sure they are switched on and go to your PC and open the terminal. Check your network and the connected devices. On a Mac the command would be:
arp -a
This command will list all IP addresses of all devices connected to your network in the following format:
? (192.168.0.5) at aa:bb:cc:dd:ee:ff on en0 ifscope [ethernet]
Write them down to remember them later for your configuration. EVCC will communicate over these IP addresses. Make also sure that the devices have static IP addresses so they do not change over time. You should verify the setting over the admin menu of your router at home.
This is already the first step and leads to the second step, where you will take the information to fill out the configuration file of EVCC accordingly.
Configuring EVCC
Create a new directory on your machine where you will store the configuration file and any related Docker files, for example:
mkdir ~/evcc
cd ~/evcc
Testing the docker container on your local machine first helps with debugging and configuration adjustments, saving time when setting up complex devices like the wallbox or PV system. Inside this directory, create an evcc.yaml file. Alternatively you can download a template from the EVCC GitHub repository.
curl -o evcc.yaml https://raw.githubusercontent.com/evcc-io/config/main/evcc.yaml
Make sure to also create a docker-compose.yml file for EVCC in the same directory as shown below.
version: "3"

services:
  evcc:
    image: evcc/evcc:latest
    container_name: evcc
    volumes:
      - ./evcc.yaml:/etc/evcc/evcc.yaml:ro
    ports:
      - 7070:7070
    restart: unless-stopped
    environment:
      - TZ=Europe/Berlin
You can run the docker EVCC with:
docker-compose up -d
The tricky part of the setup and also the reason why I strongly advice to run Docker locally is the configuration evcc.yaml file and how easy it is to troubleshoot in this setup. This file is where all the magic happens and the final part of where I ant to focus on in this step.
You should focus on each device step by step and add the next in the configuration file once to the you verify on your local machine that the setup is working as expected. You can reach the user interface under http://localhost:7070 for checking the behavior of the software.
Firstly you should add the following part on top, but adjust it to your needs:
network:
  schema: http
  host: 192.168.178.46 # IP address of the host - will be the IP address of you NAS, Raspberry PI or else
  port: 7070

interval: 10s

database:
  type: sqlite
  dsn: ./root/.evcc

sponsortoken: <Sponsortoken> # In case you have / need a sponsortoken put it in here
telemetry: true

log: info
The critical part was the Kostal Plenticore setup which is listed down below:
meters:
  - name: grid
    type: template
    template: kostal-ksem-inverter
    usage: grid
    modbus: tcpip
    id: 71
    host: KSEM-75349851
    port: 502

  - name: pv
    type: template
    template: kostal-plenticore
    usage: pv
    modbus: tcpip
    id: 71
    host: 192.168.178.33
    port: 1502
In contrast, the integration of both the car and the wallbox were wasier to figure out as I already had the sponsortoken etc. setup at this point in time. You can find it down below. I purposely let these parts together as they are bundled under the site key inside the configuration file.
chargers:
  - name: hardybarth_salia
    type: template
    template: hardybarth-salia
    host: 192.168.178.32

vehicles:
  - name: car1
    type: template
    template: renault
    title: Renault Zoe
    user: <User>
    password: <Password>

site:
  title: Home
  meters:
    grid: grid
    pv: pv
    battery: battery
  residualPower: 0
  prioritySoc: 0
  bufferSoc: 0
  bufferStartSoc: 0
  maxGridSupplyWhileBatteryCharging: 0 above this value
  smartCostLimit: 0

loadpoints:
  - title: Garage
    charger: hardybarth_salia
    mode: 'off' publicly available
    resetOnDisconnect: true
    phases: 3
    charger: 0
    minCurrent: 6
    maxCurrent: 16

    priority: 0
    soc:
      poll:
        mode: charging
        interval: 60m
      estimate: true
I hope that your setup will was successful by following these steps until this point. So far you already have a done the whole installation locally. The next and final step is all about doing the installation on your NAS such that the app is always available via your home network.
Setting up Synology 918+ with Docker
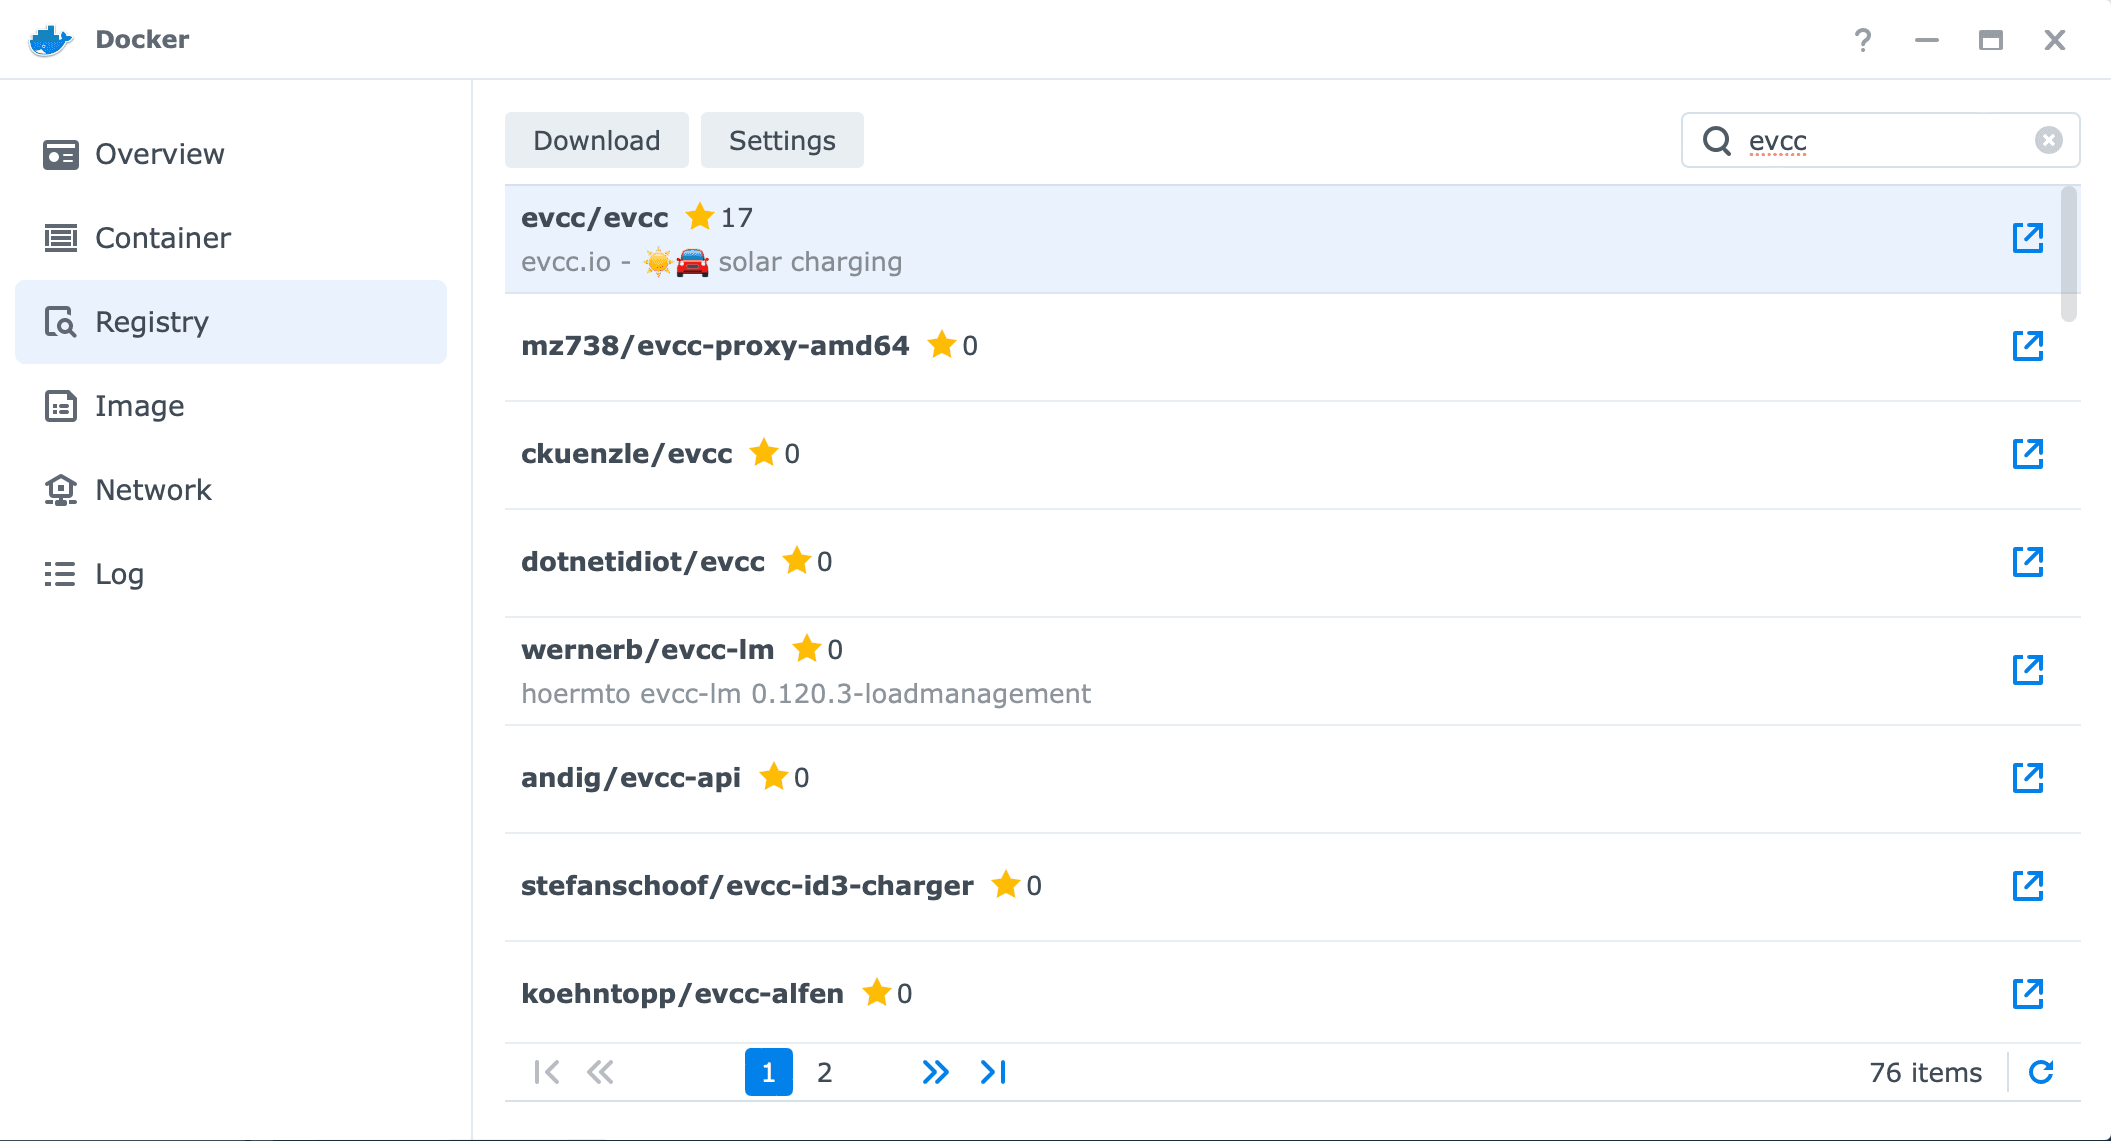
For those unfamiliar with Docker, here's a great article on how to set up Docker on a Synology NAS. As I already mentioned, EVCC has a great documentation especially for the Docker installation on your Synology NAS which can be found here. This is why I will keep myself short on this one. If you already worked with Docker on your NAS you will already know the basic steps - getting the Docker image, building the docker container from that image and spinning it up. The image can be found under evcc/evcc under the Registry tab on the left side of your Docker application like shown in the image below.

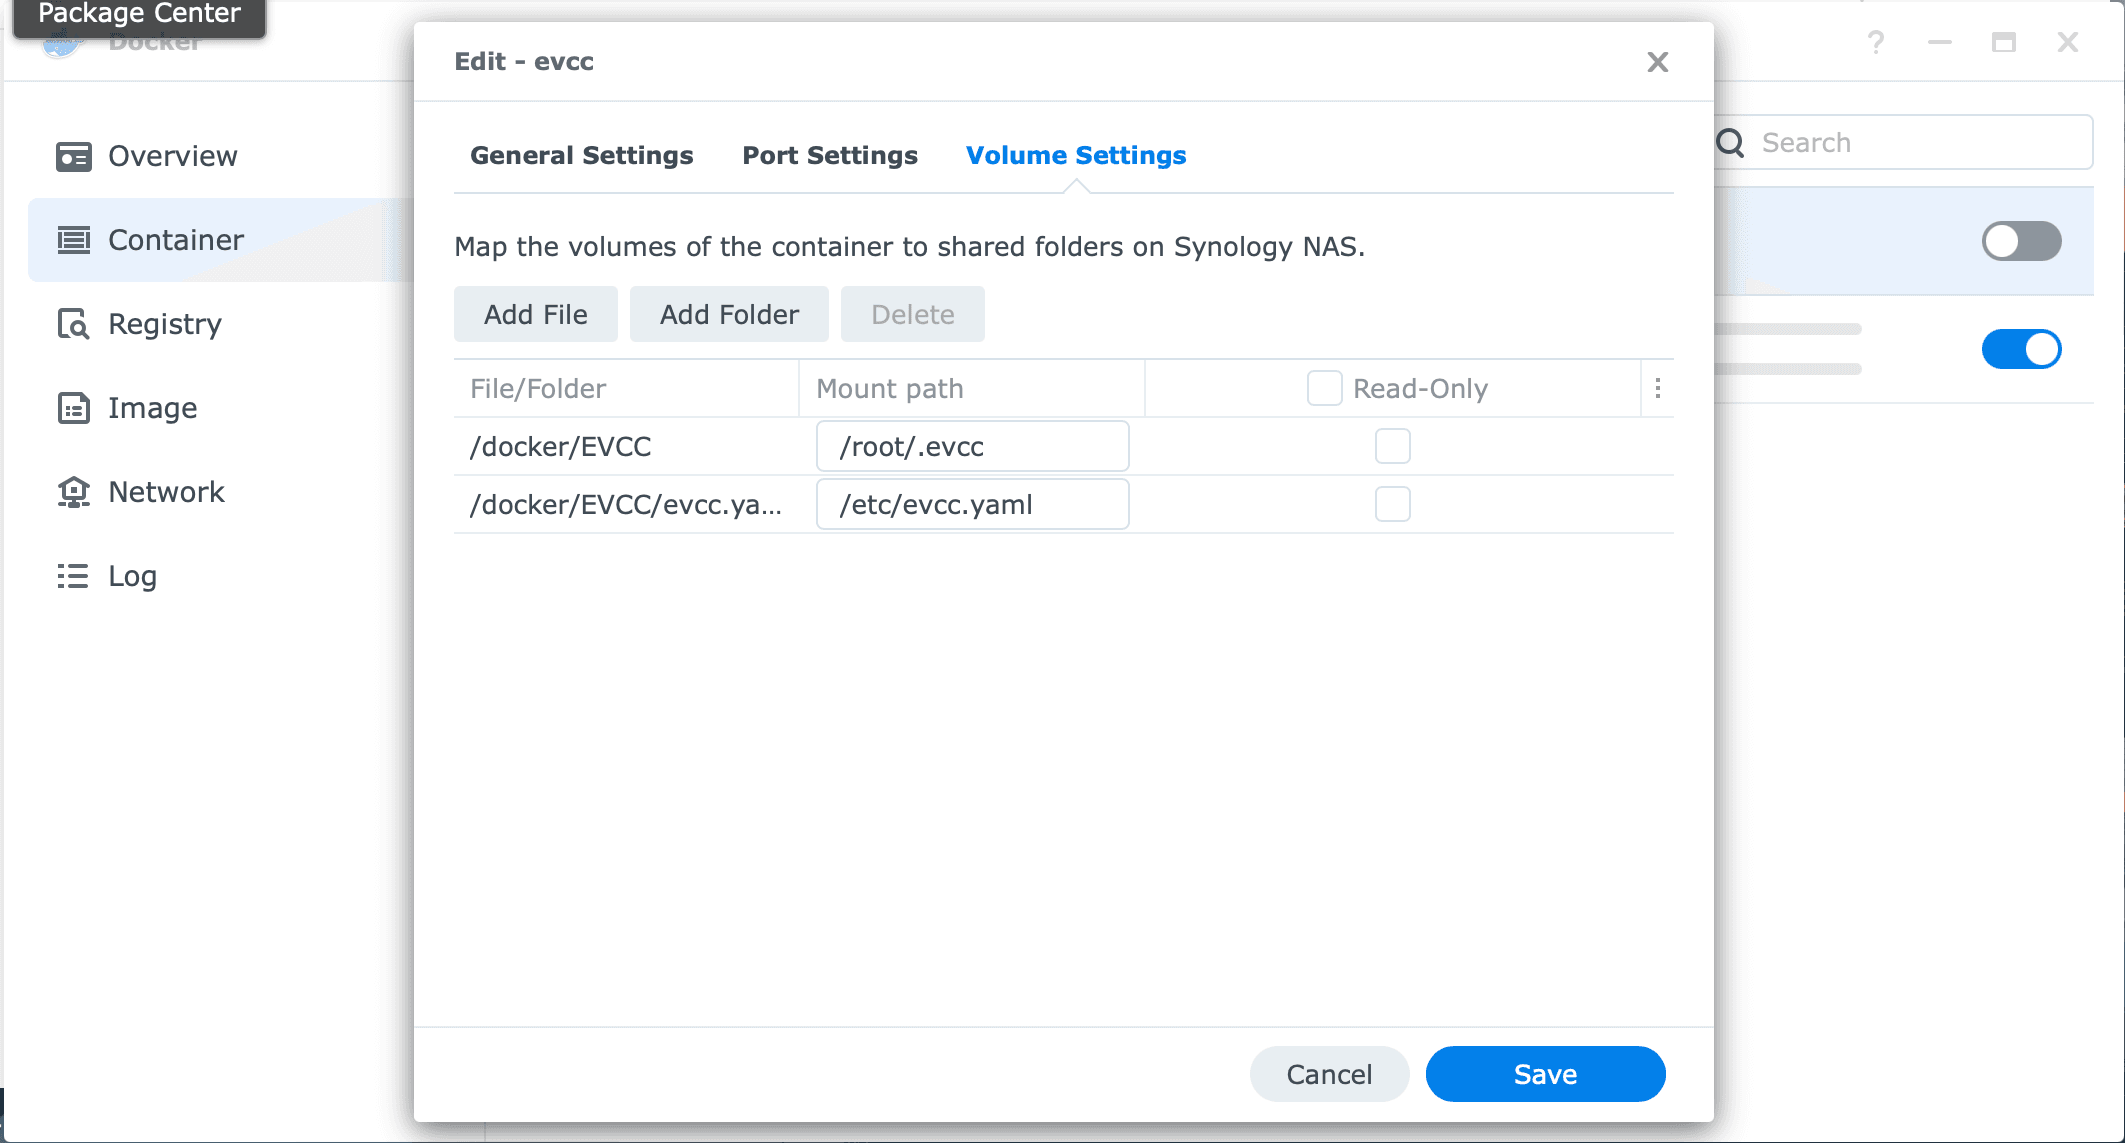
There are two main configuration settings which you can modify in order to adjust the Docker container to your needs. The first one is the mapping of the evcc.yaml configuration file. You need to map it to the Docker container as well as the database. By doing so you ensure, that the data and configuration is permanently stored as a Docker container is reset to it's initial state after shutting it down. Volume mapping as shown below is therefore the preferred way to persist data outside of the container's lifecycle. More on that can be found on the Docker documentation. The image below shows how I mapped my Docker container. Thesyntax is very easy: Choose the File/Folder outside of your container on the left side and provide Docker with the path on the containers inside on the right side under Mount path.

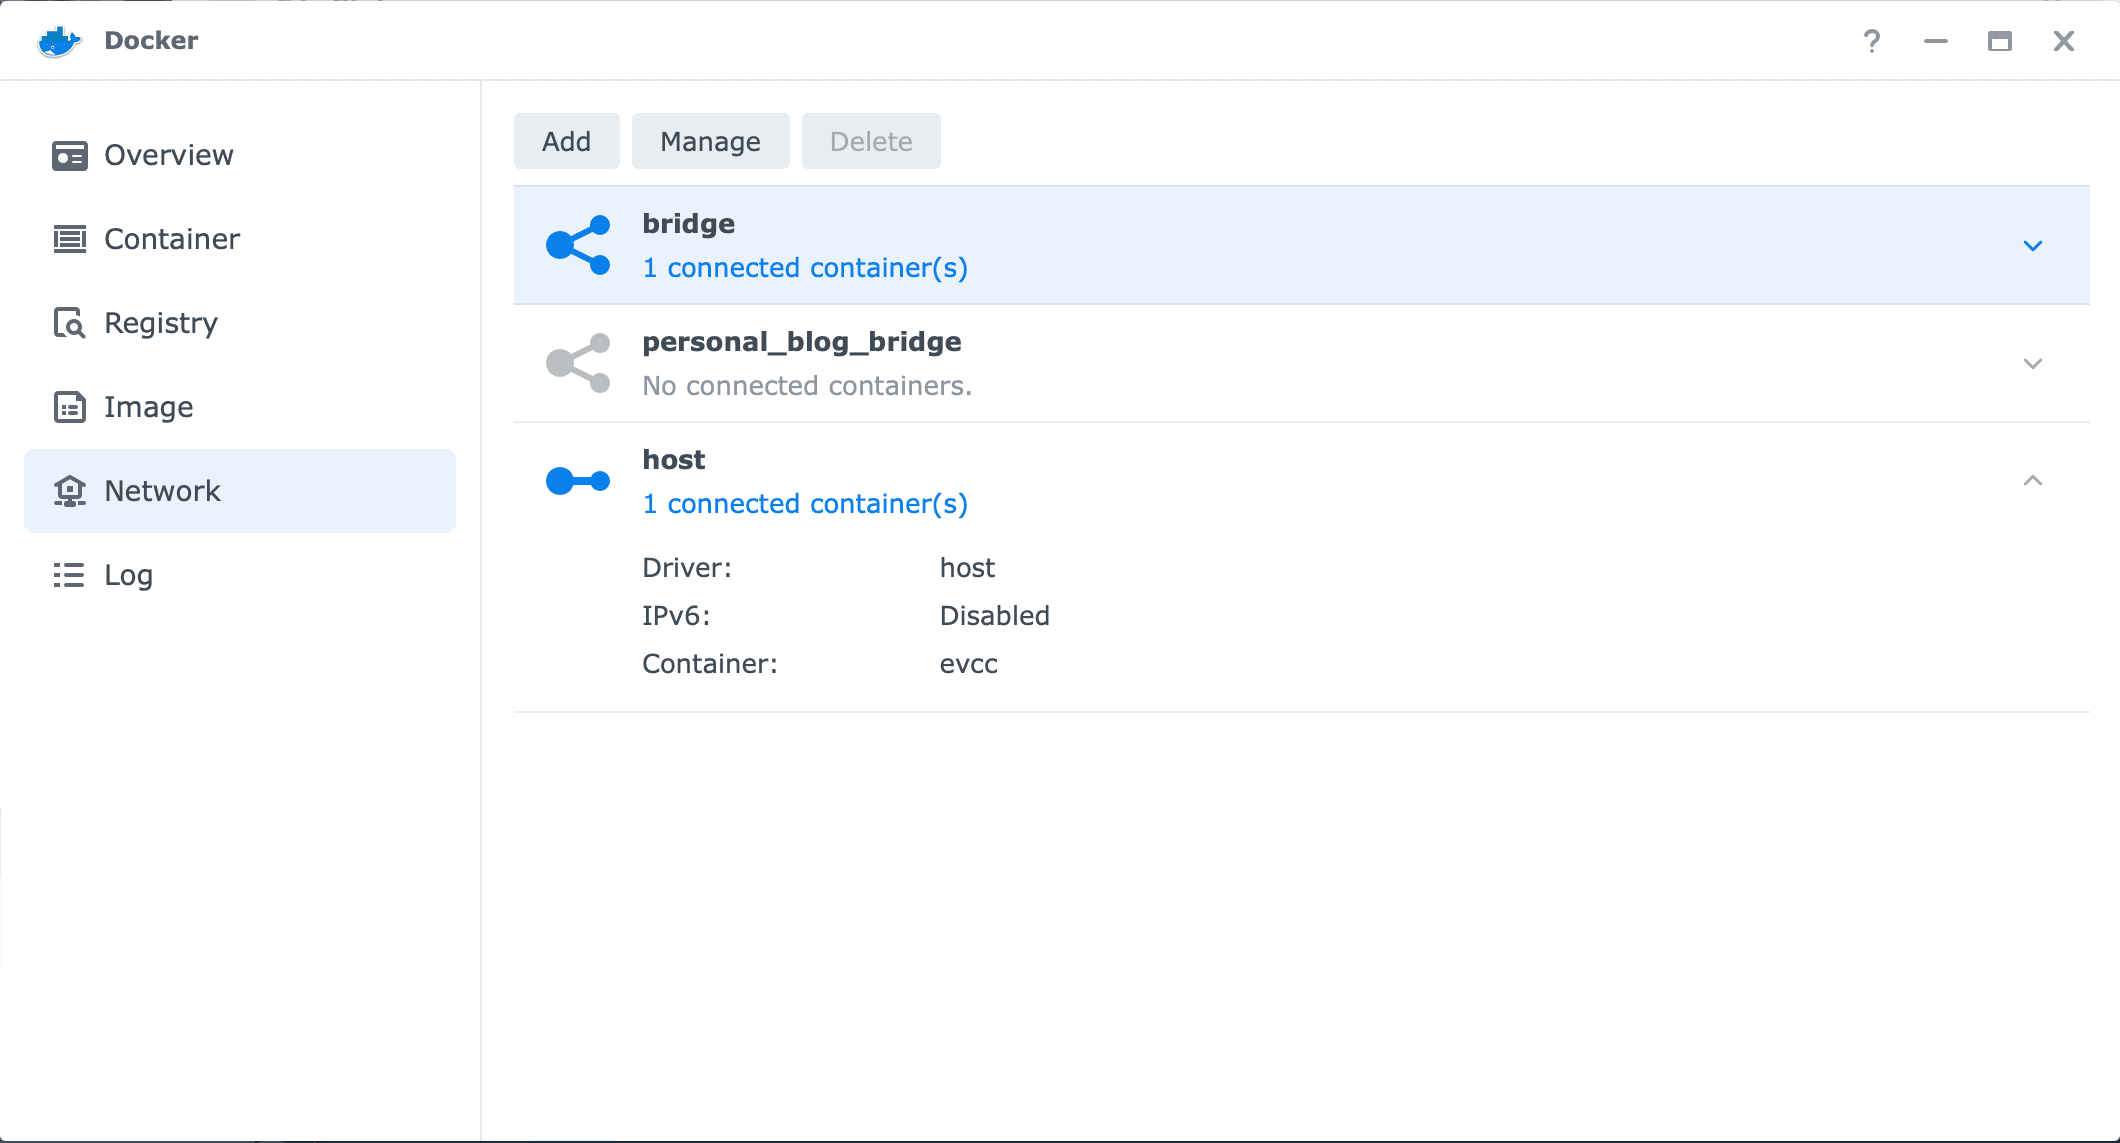
The last configuration setting I want to mention here is the decision you have to make between the host and bridge mode. You should use Bridge Mode if you need:
- Network isolation between containers and the host.
- Control over which ports are accessible outside the container.
- Flexibility in container-to-container networking (e.g., microservices or multi-container applications).
- Higher network performance and lower latency.
- The container to interact with the host's network directly, without needing specific port mappings.
- Applications that need unrestricted access to the network interfaces on the host (like network diagnostic tools).

I opted for Docker host mode as shown in the image above because of the network configuration in my parent's house. You will likely go with bridge mode (This mode is most commonly used). By choosing these configuration settings you should be able to reach the interface under the IP address of the Synology NAS and the port of EVCC which is 7070 by default.
Final thoughts
With EVCC fully configured, my parents can monitor and control their entire energy system: tracking solar energy production, optimizing EV charging, and ensuring excess energy was stored in the home battery. EVCC's intuitive interface provides real-time data and allows them to make informed decisions on their energy consumption and efficiency.
Have you tried EVCC or similar tools for your home automation? Let me know and stay tuned for more updates!
Sincerely, Josef